Much like other Windows programs and applications, the Start Menu in Windows 11 has issues that sometimes cause it to malfunction. We have noticed many Windows 11 users face issues with the Start Menu on their PC or laptop. If you are looking for working fixes for the Start Menu not working in Windows 11 issue, you have come to the right place. In this article, we have provided working ways to fix Start Menu in Windows 11.
Fix Start Menu Not Working in Windows 11
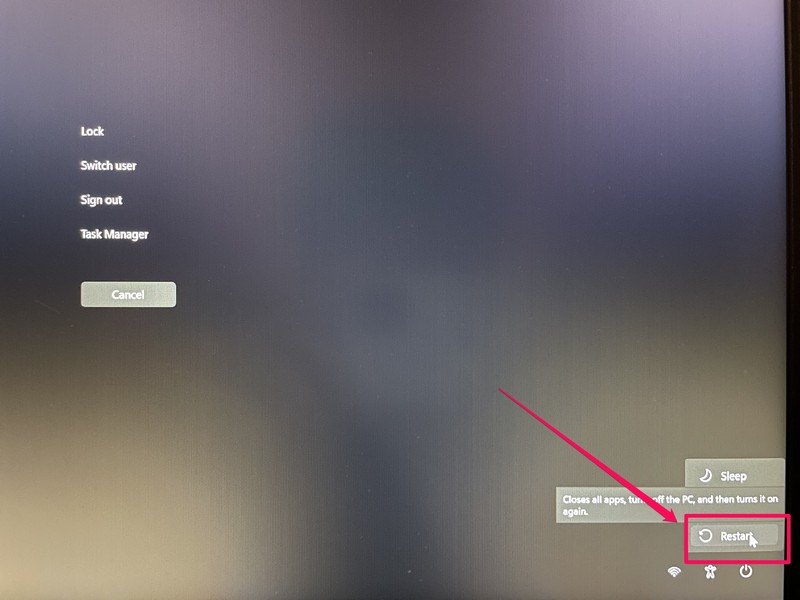
The Start Menu not working in Windows 11 is not an uncommon issue amongst users and it can be caused by anything ranging from missing/ corrupt system files, temporary Windows bugs, and issues in background services to viruses/ malware and outdated Windows builds. Hence, when the Start Menu stops working on your device, the first thing to try is restarting your PC or laptop. A quick restart is always handy in solving minor RAM and system issues that might be preventing the Start Menu to function properly. However, restarting a device in which the Start Menu is not working can be tricky. You can press the Ctrl + Alt + Del shortcut to enter the Advanced menu screen and then restart your PC/ laptop from there. Nonetheless, if you have already tried restarting your device and it did not fix the issue, try the fixes listed right below.
1. Check for Windows Lock in Windows 11
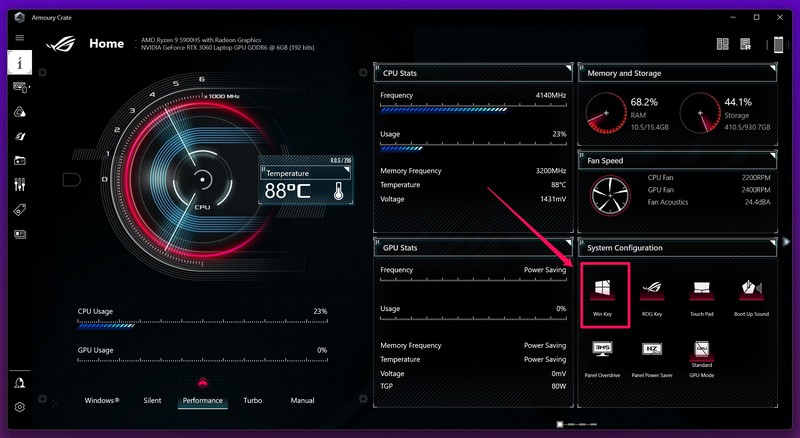
Now, if you are using the Windows button on your keyboard to open the Start Menu and it does not open, there is a high chance that the win-key-lock feature is enabled on your PC or laptop. For those unaware, many laptops and PCs come with a Win-key-lock feature that enables users to lock the Windows key on the keyboard. This is pretty useful for gamers who do not want to accidentally press the Windows key and open the Start Menu during an intense battle royale match. Now, the thing about the Win-key-lock feature, different brands have different settings for the feature. For my Asus ROG Zephyrus laptop, the Windows lock button can be located inside the ROG Armory Crate software. From there, I can either enable or disable it just by clicking the dedicated button. So, before you move on to the next fixes, be sure to check if your laptop or PC has the win-key-lock feature enabled or not.
2. Restart Windows Explorer
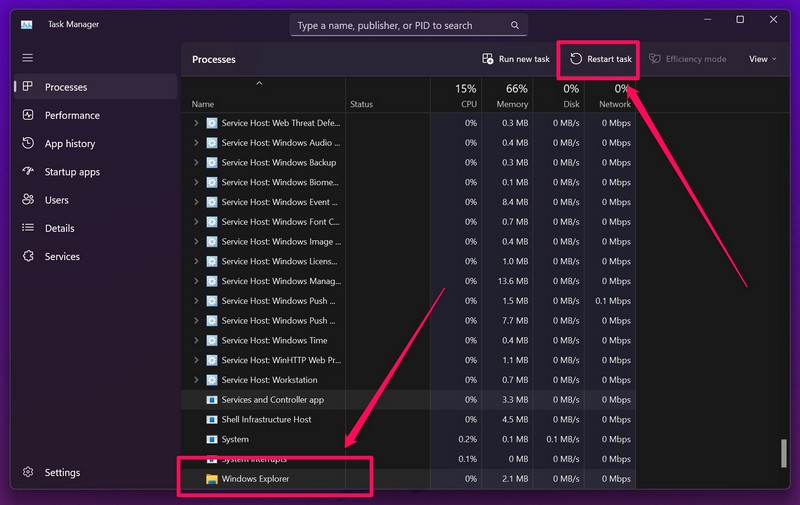
Windows Explorer is essentially a background service that handles various system-level operations in Windows, including the functions of the Start Menu. Hence, restarting the service often resolves these kinds of issues in Windows and it is one of the quickest fixes out there. So, to restart the Windows Explorer service in Windows 11, follow the steps right below:
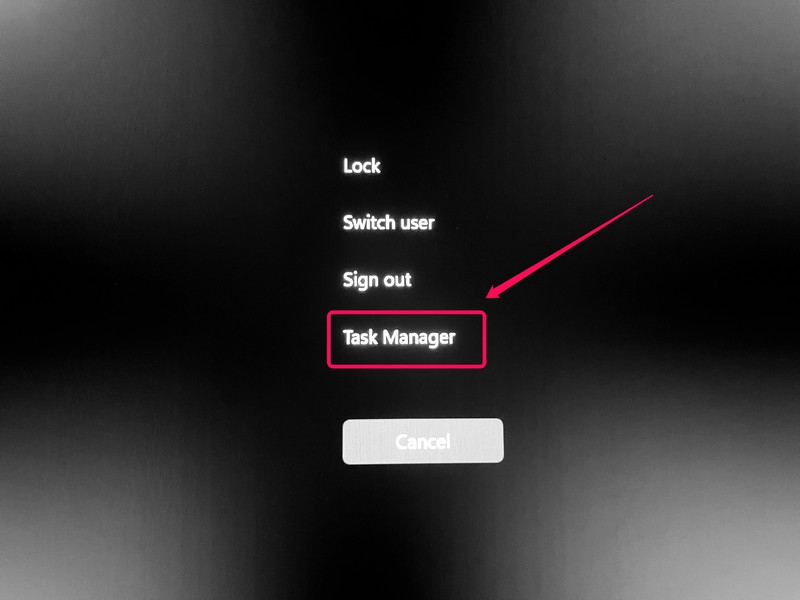
- Press Ctrl + Alt + Del and open the Task Manager.
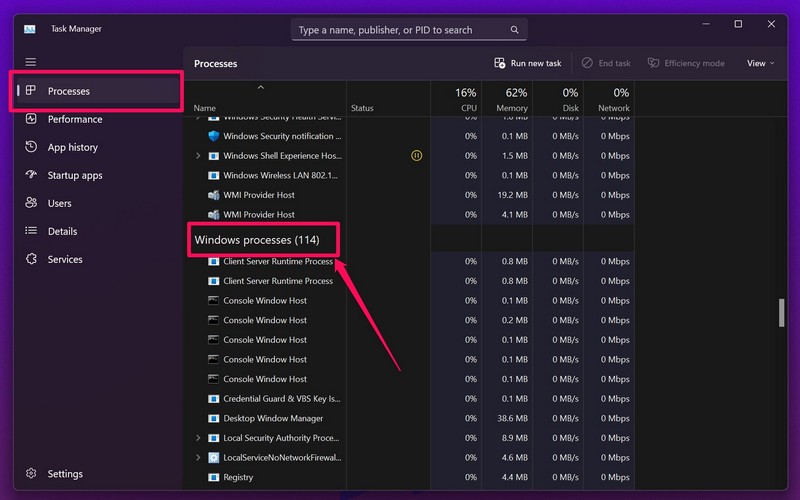
- Under the Processes Tab, scroll down to the Windows Processes section.
- Find the Windows Explorer service on the list. Alternatively, you can use the new Task Manager search feature to find the Windows Explorer service.
- After you find it, select Windows Explorer and click the Restart task button at the top. This will restart the Windows Explorer background service on your Windows 11 device and resolve minor glitches and issues that might be causing the Start Menu not working issue. If it does not resolve the issue, move on to the next fix.
3. Run SFC Scan in Windows 11
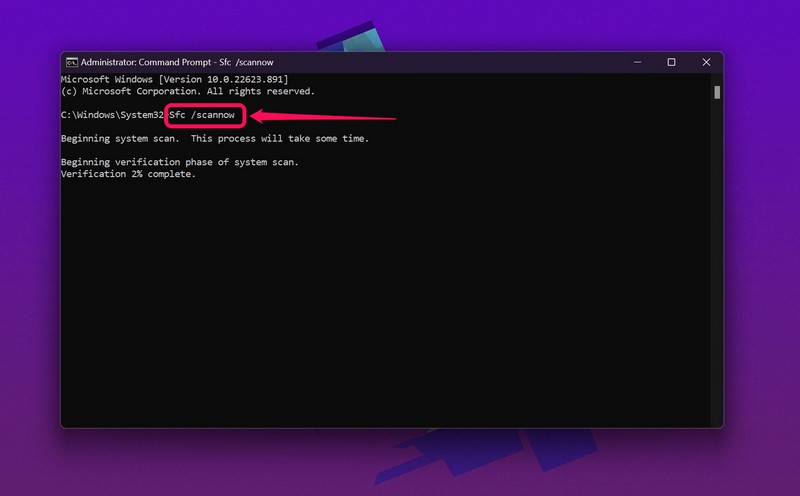
As aforementioned, missing or corrupt system files in Windows 11 can cause various issues on your PC or laptop, and a malfunctioning Start Menu is one of these issues. Although a corrupted system file sounds serious, the good news is that it is easily fixable. The System File Checker (SFC) scan is one of the most effective command-line tools that can fix issues with the system files in Windows 11. So, running these scans is surely a good idea as they are highly effective and can resolve the Start Menu not working issue on your PC or laptop in a jiffy. To run an SFC scan in Windows 11:
- Use Windows search to find the Command Prompt tool and choose the Run as administrator option.
- In the Command Prompt window, type in or copy-paste the following command and press Enter:
- Wait for the SFC scan to complete.
- After completion, restart your PC or laptop. Following the restart, try opening the Start Menu in Windows 11. If it works, well and good. However, if it does not, move to the DISM scans.
4. Run DISM Scans in Windows 11
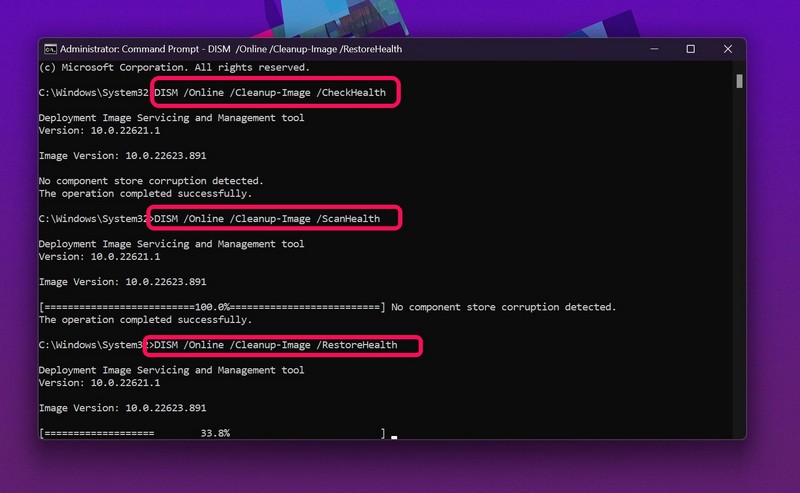
The Deployment Image Servicing and Management (DISM) scan is a set of command-line tools, similar to the SFC scan, that can scan and resolve issues with Windows system images on your Windows 11 PC or laptop. Hence, if the SFC scan does not fix the Start Menu issues in Windows 11, there is a high chance that the DISM scans will. Now, to run the DISM scans on your Windows 11 laptop or PC, follow the steps right below.
- Run the Command Prompt tool as an administrator just as you did for the SFC scan.
- In the Command Prompt window, type in or copy-paste the following command lines and press Enter one by one: Note: Do make sure to run the DISM scans one by one and not simultaneously.
- Wait for the last scan to complete and then restart your laptop/ PC. Following the restart, the Start Menu should start working on your Windows 11 device.
5. Check for Viruses/ Malware Using Windows Security
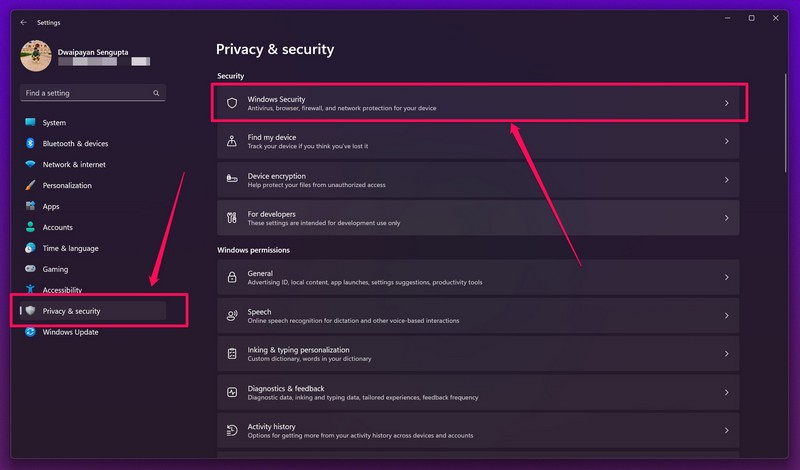
Now, if the above command-line tools did not resolve the Start Menu issues in Windows 11, chances are that there is a virus or malware that is causing the issues. In this case, you can use the built-in Windows Security tool to scan your PC or laptop and find the threat files that might be preventing the Start Menu from functioning properly. So, to use the Windows Security tool on your Windows 11 laptop/ PC:
- Open the Settings apps using the Windows + I keyboard shortcut.
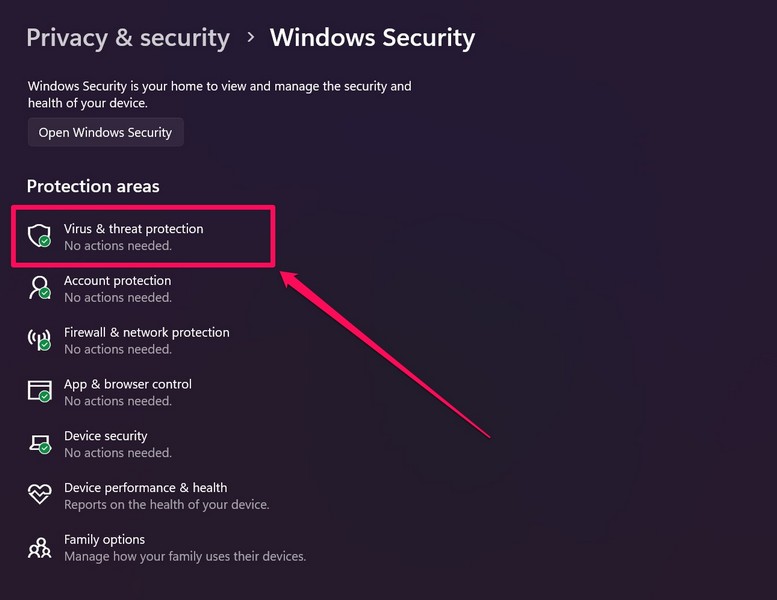
- Under the Privacy & security tab, select the Windows Security option at the top.
- Choose the Virus & threat protection on the following page.
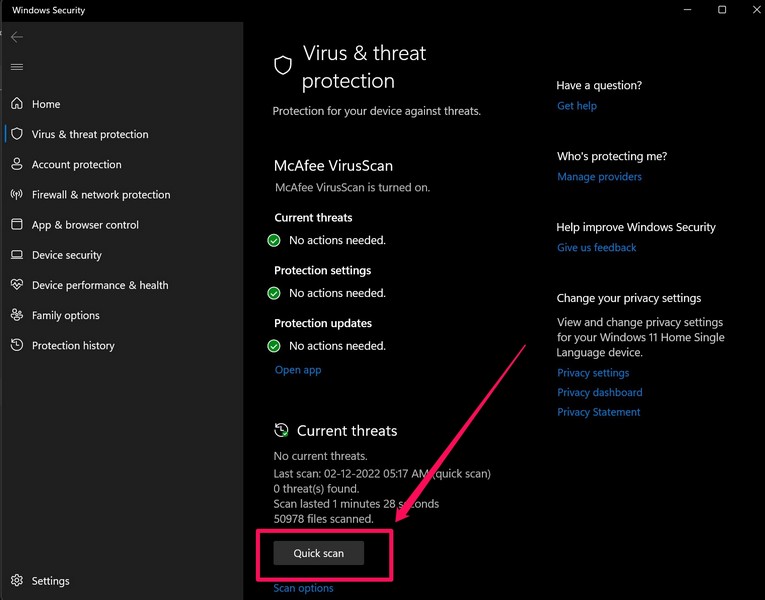
- Click the Quick scan button at the bottom on the Virus & threat protection page.
- Wait for Windows 11 to finish the scan and find the threat files. Following the scan, the Windows Security tool will provide you with the suggested action that you could take to remove the threat files from your Windows 11 PC or laptop. After the removal of the issue-causing files from your system, restart your device, and try opening the Start Menu.
6. Use a Local User Account
Now, the cause for many system-level issues such as the Start Menu not working issue might be related to your Microsoft account with which you are logged in to your Windows 11 PC/ laptop. If that is the case, you can use a local user account on your Windows 11 PC to check if the Start Menu is working on that account or not. So, to create a local user account in Windows 11:
- Open the Settings app with the Windows + I shortcut.
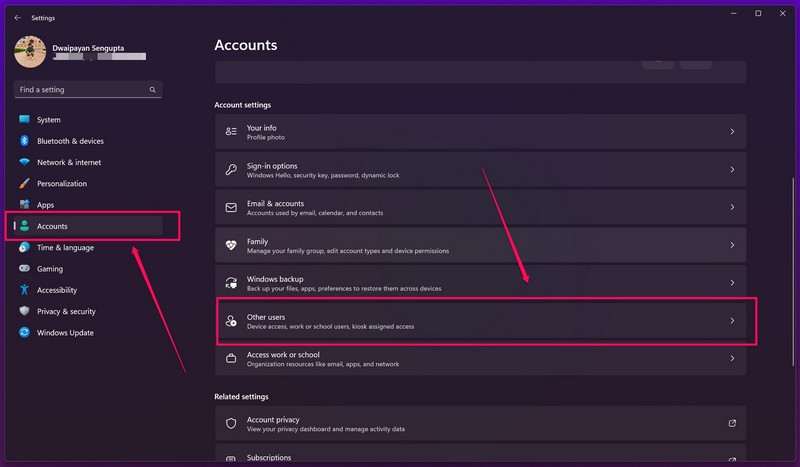
- Go to the Accounts tab on the left pane and select the Family & other users option. It may also be listed as Other users.
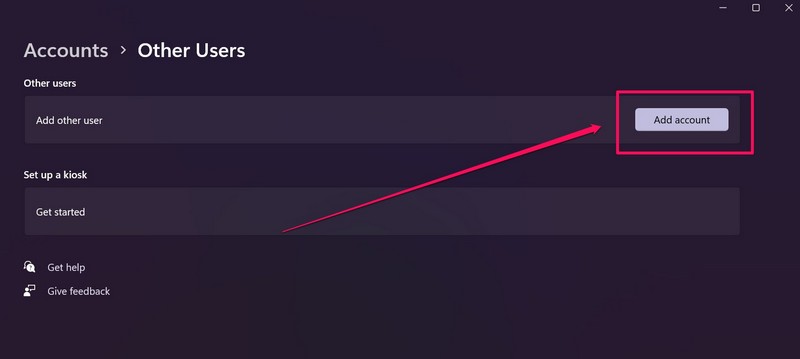
- Now, click the Add Account button to start the process.
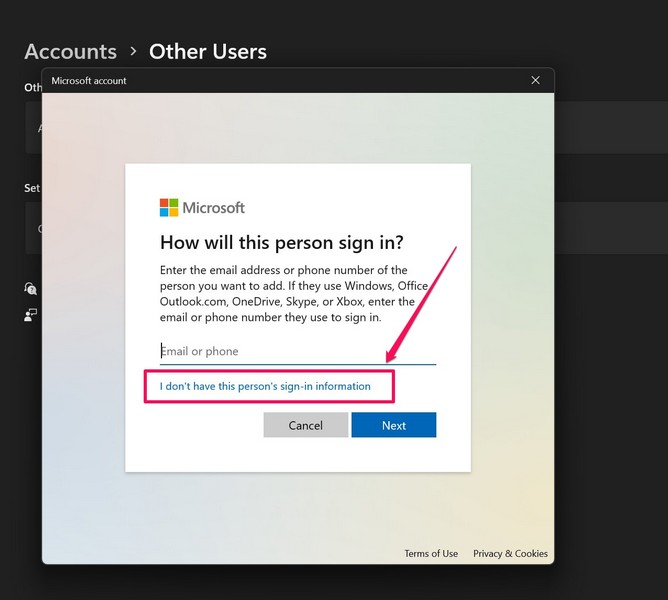
- On the following prompt, choose the I don’t have this person’s sign-in information option right below the text field.
- Now, select the Add a user without a Microsoft Account option and follow the on-screen instructions. Now that you have set up your local user account on your Windows 11 device, restart your PC or laptop and sign in with the newly-created local account. Using this account, check whether the Start Menu is working or not. If it does, there is definitely an issue with your Microsoft account that is causing the Start Menu to malfunction.
7. Check for Windows 11 Updates
Oftentimes, an outdated Windows version can cause system issues in Windows such as the Start Menu not operating properly. If that is indeed the case, you can check for the latest Windows 11 updates on your PC or laptop and upgrade your system to resolve such system issues. However, issue or no issue, it is always best to keep your Windows 11 OS up to date. Hence, you can use the steps below to check for Windows updates on your device from time to time and keep it updated to avoid these kinds of issues. So, to check for new updates in Windows 11:
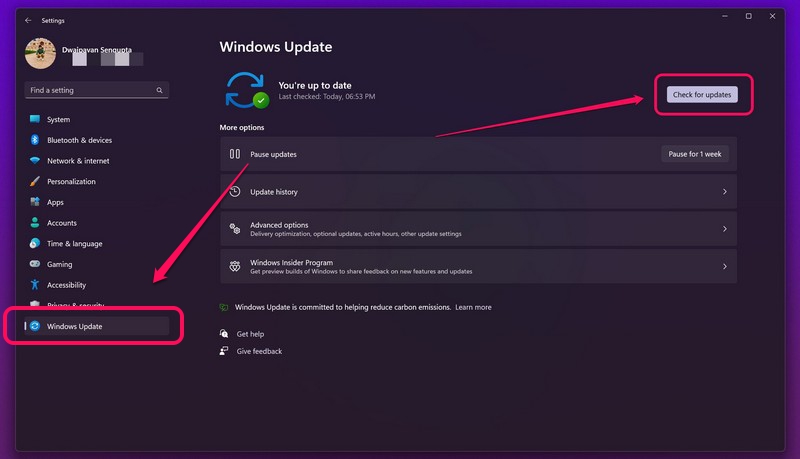
- Open the Settings app with the Windows + I shortcut.
- Go to the Windows Update tab from the left pane and click the Check for updates button.
- Now, wait for the latest updates to show up.
- Click the Download and install button that appears at the top to update your laptop/ PC.
- Following the updates, restart your Windows 11 device, even if Windows does not prompt you to do so. Following the update, Windows 11 should fix temporary bugs or glitches that might have been causing the system issues on your laptop or PC. Hence, check if the Start Menu is working on your device after the update or not. It should be fixed if the issue was caused by temporary bugs in the Windows OS.
8. Reset Your PC/ Laptop
Now, if all the above methods fail to fix the issue and get the Start Menu up and running on your PC or laptop again, it is time for the last resort, and that is resetting your device. Resetting your device will delete all the files and data stored in the C Drive and will reset Windows 11 settings for your PC or laptop. Hence, be sure to back up your device before executing the following steps on your Windows 11 device. So, to reset your Windows 11 device:
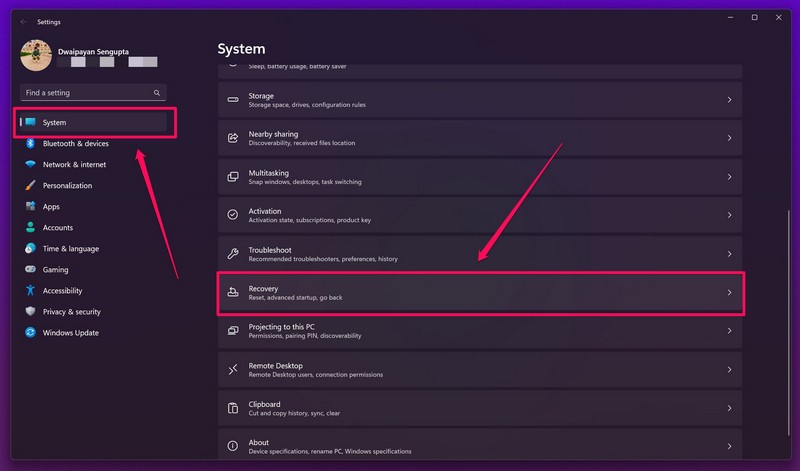
- Open the Settings app by pressing the Windows + I shortcut.
- Under the System tab, click the Recovery option.
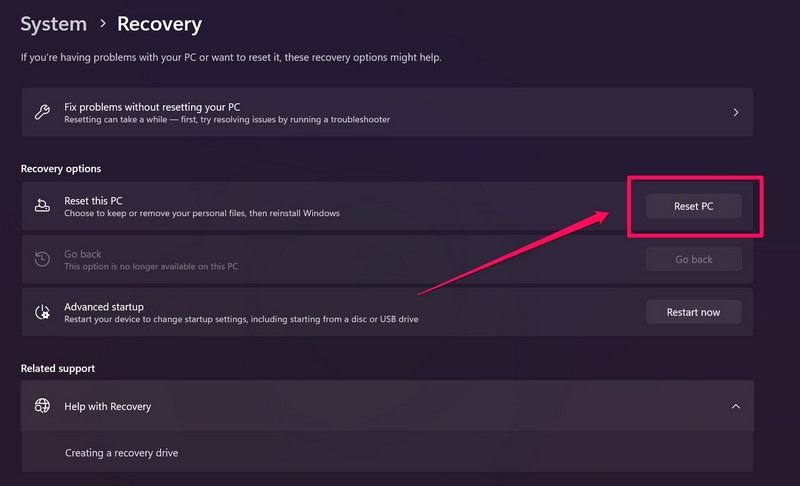
- Now, click the Reset PC button adjacent to the Reset this PC option under the Recovery options section.
- Follow the on-screen instructions to reset your Windows 11 device. Do make sure not to turn off your PC/ laptop amidst the reset process and in the case of a laptop, keep it connected to power until the process completes. After resetting your Windows 11 PC or laptop, set up the device as per your preference. And this should surely fix the Start Menu not working in Windows 11 issue on your device.
Why is the Start Menu not responding in Windows 11?
There can be a plethora of reasons why the Windows Start Menu might not function properly. These include misconfigured Windows settings, temporary Windows bugs, corrupt system files, and many others.
Why is the Windows Start Menu not opening with the Windows key?
If you are pressing the Windows key on your keyboard and the Start Menu does not open, chances are that your keyboard has issues. Check if all the keys on your keyboard work or not before trying out other fixes. Also, you can check out if you have the win-key-lock feature enabled.
Why is the Taskbar not responding in Windows 11?
Much like the Start menu not working issue in Windows 11, there can be a number of reasons why the Taskbar might become unresponsive, including missing/ corrupt system files, outdated Windows builds, minor issues in Windows Explorer, and many others.
Wrapping Up
So, these are some of the best tried and tested fixes for the Start Menu not working in Windows 11 issue. We hope the above fixes help you resolve the Start Menu issues on your Windows 11 PC or laptop without needing to reset the device. And if one of these did help you fix the issue, let us know about it in the comments right below. You can also check out other guides for Windows issues. Thanks for reading the article till the end and we will see you at the next one.
