What actually happening is when they put the Windows 11 PC on sleep mode for more than 20-30 minutes and later when they try to wake up, it get stuck and remain in sleep mode even after pressing the power key or opening the lid. Force reboot is the only way wake up device from sleep mode Usually when you put PC in sleep mode, making a click on mouse or pressing a key on keyboard wake up the PC automatically. But for the users who’re affected by this annoying bug, PC won’t wake up. The issue is popular among both type of users who have upgraded to Windows 11 or reinstalled Windows 11. Although, there’s no exact reason behind what stopping Windows 11 PC from exiting the sleep mode, but most of the times outdated mouse/keyboard driver or an issue with power settings is culprit.
How to Fix Windows 11 fails to Wake Up from Sleep mode
To help you our we decided to cover some of the possible troubleshooting method using which you can solve issue where PC is unable to wake up from sleep mode in Windows 11. Let’s start with first method:
Method 1: Check connections
First off, make sure that your computer is plugged in and charged. Also, make sure that all wires are connected perfectly.
Method 2: Check your mouse or trackpad
If you are using a wireless keyboard or mouse, then make sure that they are connected to your computer. Sometimes due to a low or dead battery, the mouse and keyboard won’t work and as a result, your computer won’t wake up. Try disconnecting and reconnecting the receiver of your mouse and keyboard and check again. If you are using a trackpad, make sure it is working fine.
Method 3: Update your Windows 11
Sometimes due to outdated Windows files, you can face this problem. So it is always better to keep your Windows 11 PC updated. Check if any update is available. For that: Go to Settings > Windows Update. Here on the right side, check it for the update. If not, click on Check for update button. It available, download and check if this fixes the issue.
Method 4: Run power troubleshooter
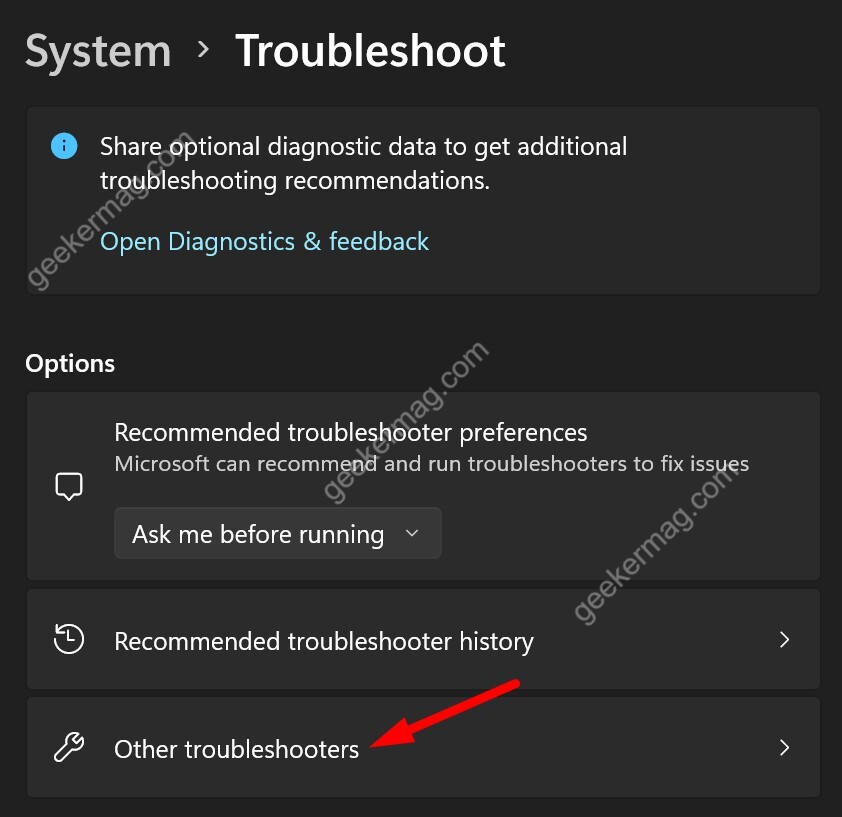
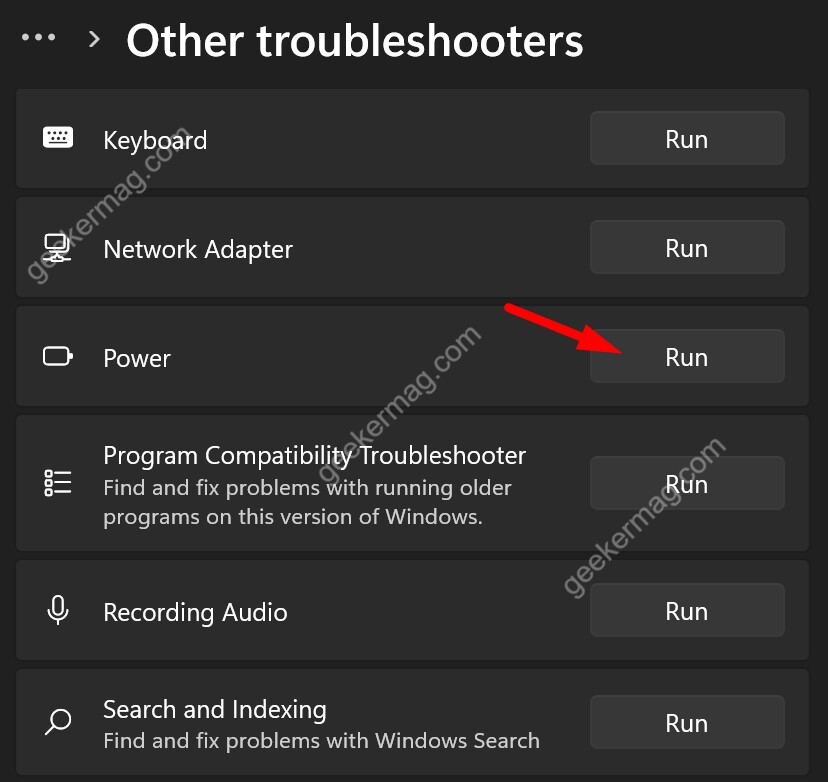
Microsoft has added a troubleshooter option that allows users to find and solve minor issues on Windows 11. To run a troubleshooter, follow these steps: Open the start menu and then search for “Troubleshoot” and from the results, click on “Troubleshoot settings.“ On this settings page, you need to select Other troubleshooters option. Find the Power option and click on Run to start the troubleshooter. Now, wait for some time. The troubleshooter will check all settings and tell you if anything is wrong. If everything is fine, skip to the next method.
Method 5: Change Mouse and Keyboard Properties
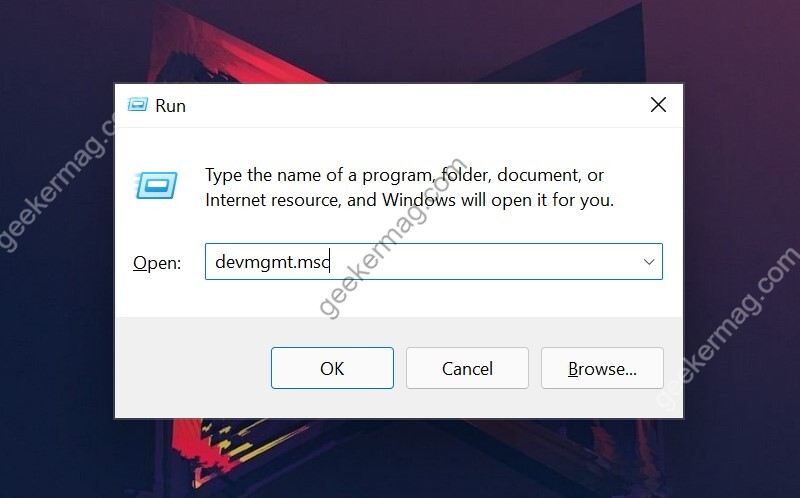
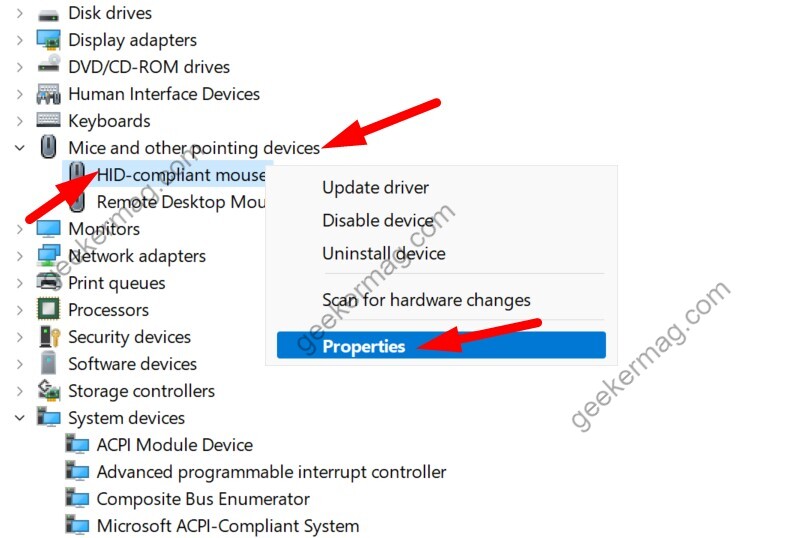
Enable the option that allows your mouse to wake up your Windows 11 from Sleep mode. Here are the steps: First open Run dialog box by pressing Windows + R. Here, you need to type devmgmt.msc and click to open Device manager. In the Device manager, find “Mice and other pointing devices” and then right-click on it, select Properties from the menu. Switch to the Power Management tab and then check the box for “Allow this device to wake the computer” option and click on OK to save the settings. Repeat the same steps for the keyboard device too.
Method 6: Update Mouse and Keyboard drivers (Recommended)
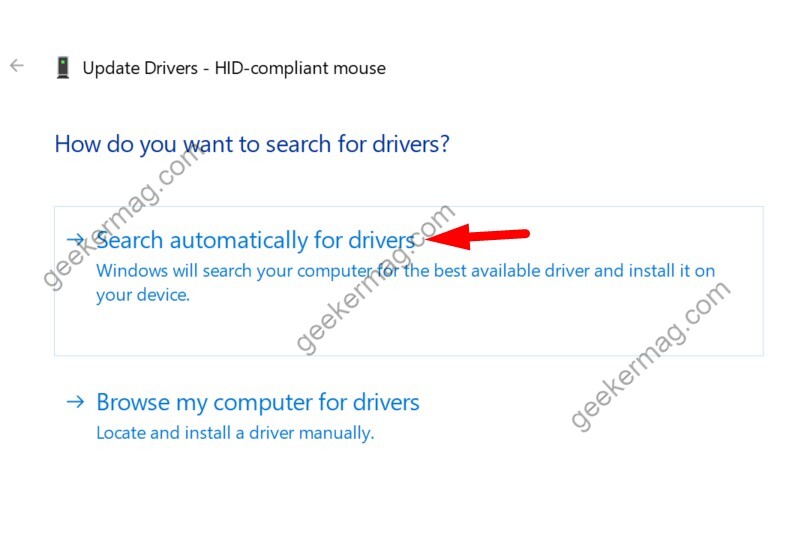
If you are still facing the same issue and unable to wake up your Windows 11 with mouse and keyboard then the issue can be an outdated driver. You can update drivers manually or you can also use 3rd party driver updater tools like Driver Easy. To manually update mouse and keyboard drivers on Windows 11, follow these steps: Open the device manager using the above method and find your mouse and keyboard. Right-click on the device > chose update driver. Select Search automatically for drivers. Your computer will automatically find and install new driver updates. Once installed, restart your computer to apply new changes. Apart from that, if is highly recommended to head over to accessory manufacturer website and download latest drivers available. If that fails to fix the issue, then We recommend users to select uninstall option from the same menu to uninstall drivers and reboot your PC. After that, head over to device manufacturer website to download drivers available for PC. Most of the times, reinstalling latest version from manufacturer website fix the issue.
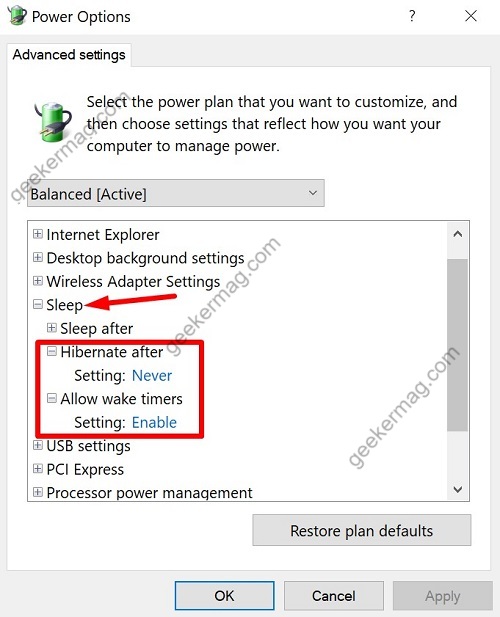
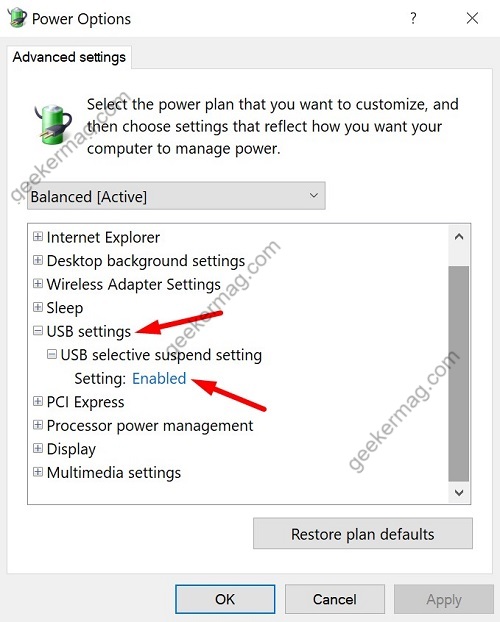
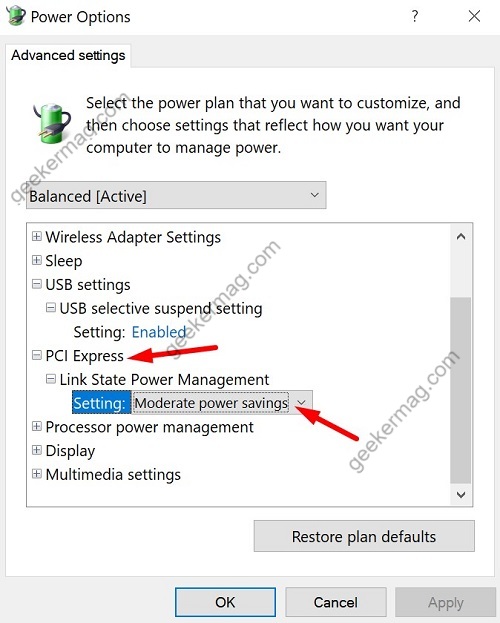
Method 7: Change Power Plan Settings
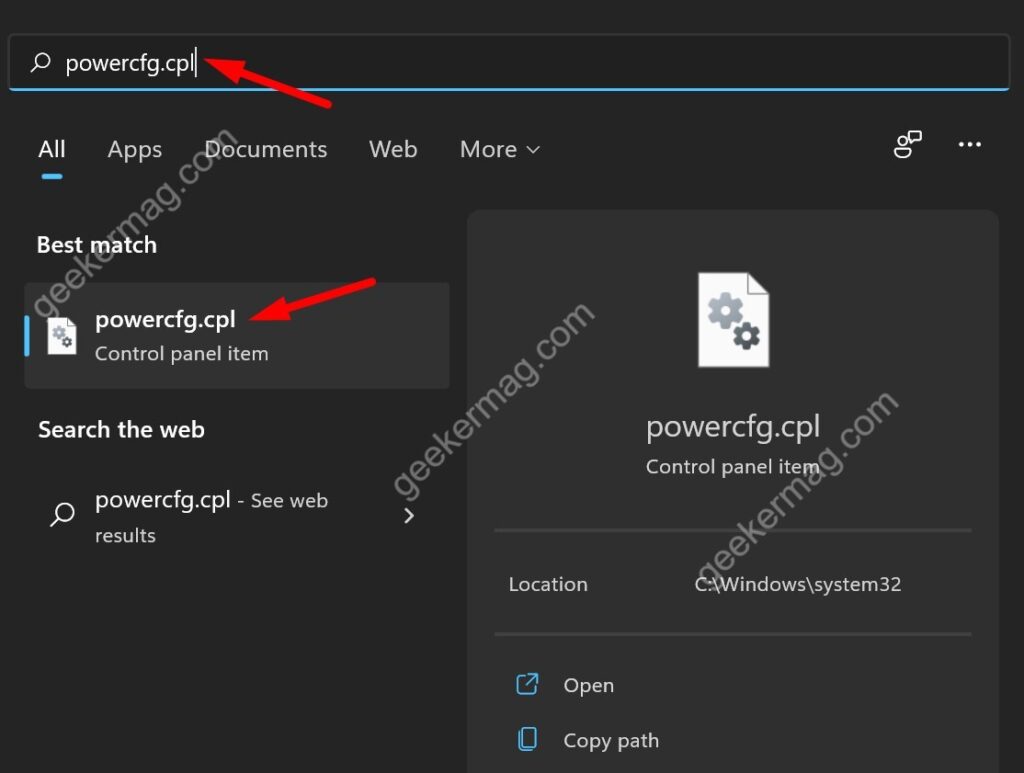
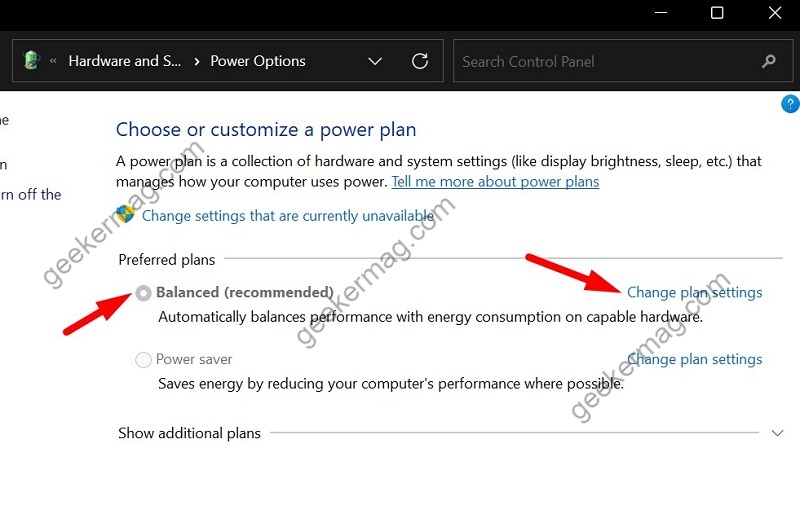
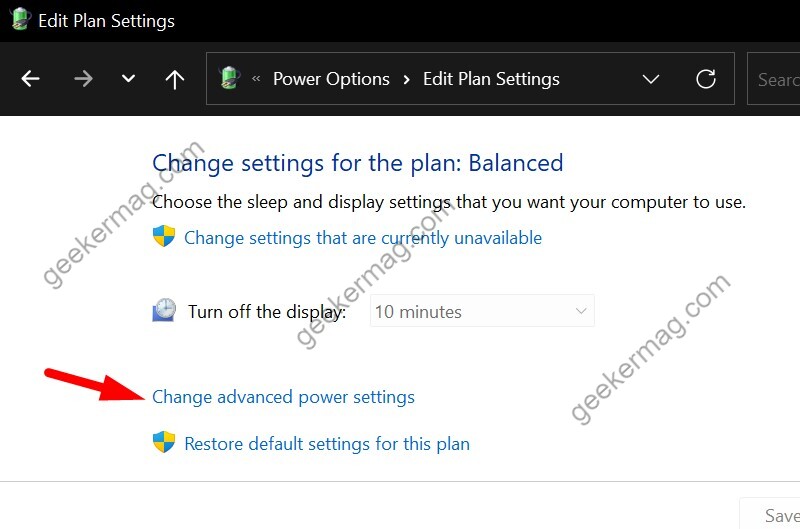
Open Windows Run command with Windows + R and type powercfg.cpl command. Press enter to run it. Click Change plan settings for your current power mode. Click Change advanced power settings. Expand Sleep. Turn off hibernate after and Enable Allow wake timers. Expand USB settings > Enable USB selective suspend setting. Expand PCI express > Link state power management. Select the Moderate power saving option. Then finally click Apply and then OK to save settings.
Method 8: Turn Off Fast Startup (Recommended)
Disabling fast startup can solve this issue. This method is working for many users. So you can try if you are still facing the same problem. You can use our previous guide to disable fast startup on Windows 11.
Last Resort
If all the methods discussed above fails to fix the issue, then last resort is to try following methods in order:
Reset your Windows 11 PC without losing date, if that fails, Repair install Windows 11 using ISO image, if that also failsClean install Windows 11
You can also share feedback about the issue you’re facing using Feedback app that comes preinstalled in Windows 11. Apart from that, if you know any other solution that helps you in fixing the same issue, then feel free to share with us in the comments.
